Today, I want to share an important trick. This is how to remove all programs in windows 7? If you know these tricks so you can do it easily. Not only Windows 7 or vista but also Windows XP. You can also able to remove the all programs menu form your start menu.
Every computer user wants to keep clean their computer. They also delete any data from their computer. I think everybody knows how to remove or uninstall any software from their computer.
If you want to remove or disable the “All Programs” from your start menu, so you can easily do it.
What is required to remove the “All Programs” from the start menu?
See here to see requirements ………………..
- No need any programming language
- No need any kinds of software
- No need to reinstall your operating system
Now I want to go to our main point, it is how to remove the “All Programs” from the start menu. It is just fun. You can tell your friends, I use my computer without any software or programs.
To see the details here to do this work…
Read Also: How to Fix Windows Crashing Issue
Steps to Remove all Program from Start Menu
#STEP 1:
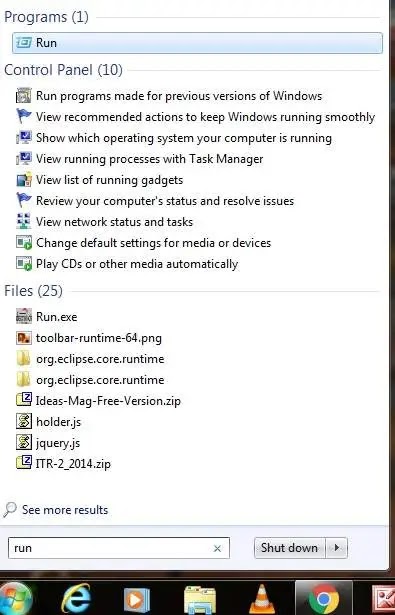
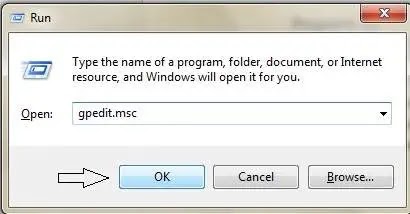
Just go start menu and search “Run”. When you get the “Run” now open it and write here “GPEDIT.MSC” (without the quote) and press the “Enter” button from your keyboard or click on “OK”.
You can also do this using the “Windows Button+R”. When you press the “Windows Button+R” from your keyboard so you can get the “Run” menu easily. Now open it and write here “GPEDIT.MSC”. Then follow the next step.
| Windows RUN |
| gpedit.msc |
#STEP 2:
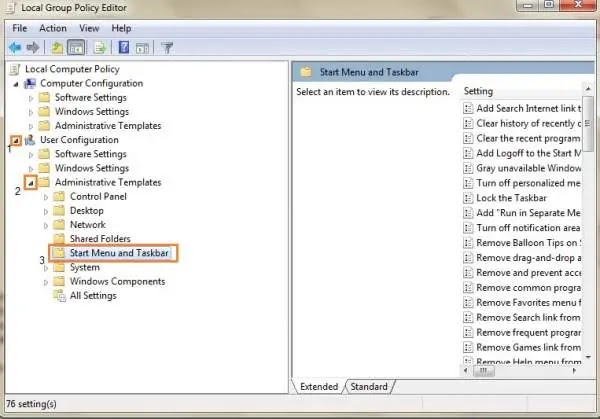
When you press the “Enter” button you can see the “Local Group Policy Editor” window. When you get the window so this time you can see two main options in the window. Computer Configuration and User Configuration under the “ Local Group Policy Editor” window. Now click on the “Administrative Templates” option under the User Configuration option.
#STEP 3:
When you click on the “Administrative Templates” option so this time you can see eight other options under the “Administrative Templates” menu. Now we have a need to click on the “Start Menu and Taskbar” option.
#STEP 4:
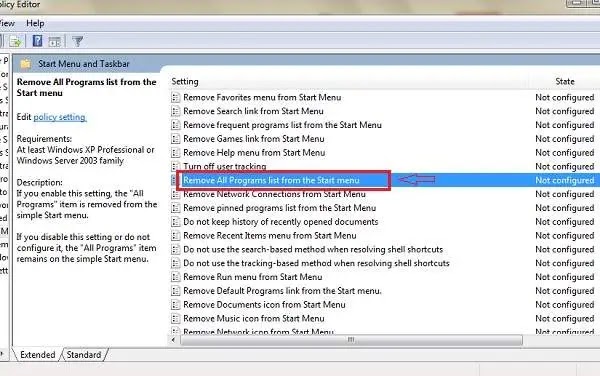
When you click on the “Start Menu and Taskbar” so you can see many other options on the right side under the “Start Menu and Taskbar” menu.
Now find the “ Remove All Programs List From The Start Menu”. When you get it now double click here. See picture in below
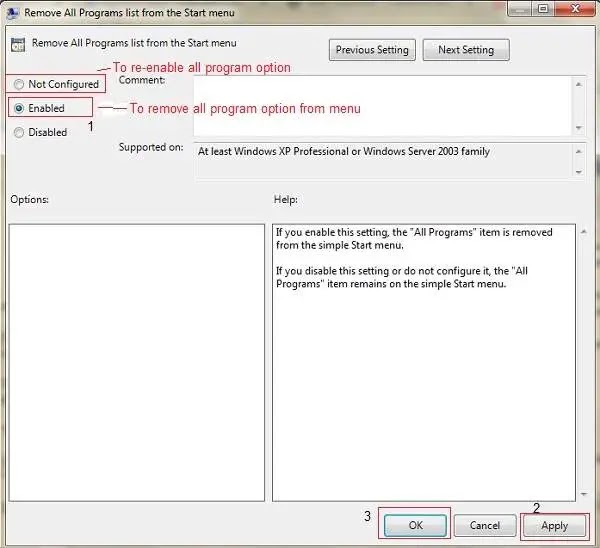
#STEP 5:
Now double click on “Remove All Programs List from the Start Menu” so you can see a new window.
When you get the new window now you can see three options in this Remove All Programs List from the Start Menu option…
You can see this setting is “Not Configured” by the windows default.
If you want to remove “All Programs” from the start menu so select on “Enabled” and click on “Apply” then “OK”.
See details in the picture in below
When you have complete the all steps now refresh your computer then click on the “Start” menu. What you see now!!!
I tell you, you can see as the picture below…
Wow!! We succeed to do this.
READ ALSO: Google input tools for windows 10, 8, 7 all version
How to Re-Enable All Program option from Menu
If you have needed the “All Programs” again now so follow the all steps and change options.
- Where we have selected on “Enabled” now change it. Now select it “Not Configured” and then click on OK.
- Then refresh your computer and see your “All Programs” option return his exact place.
Now enjoy it.
Thanks to read this post.